This post describes how to run a java application inside a docker container. I use a spring boot app with tomcat as an example but it would also work with other executable jar files. I use docker-compose for container configuration. With a new maven profile the application is build and deployed to be started as container.
Page Contents
The application and prerequisites
I used one of my github projects as the base app. The project is a simple java web application which provides registration and login capabilites. All sources available here: https://github.com/benni-wdev/user-webapp.
Please note that the post does not explain how to install docker and docker-compose.
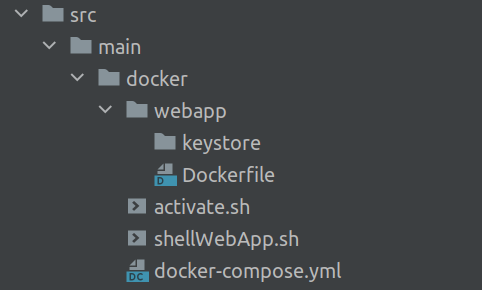
Adding directories for docker files to java project
The following directories and files were added to the project:
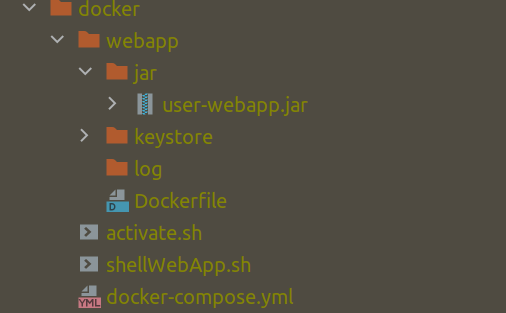
On the target side (after install) it will look like this:
The Dockerfile inside the java project
The Dockerfile contains the defintion of the container itself. The file content looks as follows:
FROM openjdk:8
ADD jar/user-webapp.jar user-webapp.jar
EXPOSE 8080 8443
ENTRYPOINT exec java $JAVA_OPTS -jar user-webapp.jar
Explanations:
- Line 1: FROM openjdk:8 - this is the image our java app image is based on. Since the project is a java 8 project we take the openjdk:8 as base image. In the same way you can use other versions as base image (e.g. FROM openjdk:17 for java 17).
- Line 2: ADD jar/user-webapp.jar user-webapp.jar - This copies the jar file into our container. The path is relative to the Dockerfile. So when the container is built the jar must be placed in a subfolder called jar. Also have a look at the target pic above (how this is done automatically with pom.xml definition follows later).
- Line 3: EXPOSE 8080 8443 - Expose the ports the java app listens on to the outside of the container.
- Line 4: ENTRYPOINT exec java $JAVA_OPTS -jar user-webapp.jar - Finally start the container. An additional environment variable $JAVA_OPTS is used here. This is used to pass arbitrary additional jvm parameters from outside. The definition will be done in the docker-compose file.
The docker-compose.yml
Docker compose can be used to manage different containers together with config and network out of one configuration. This is especially useful when multiple containers have some type of dependency. For more information about docker compose checkout https://docs.docker.com/get-started/08_using_compose/. I just use it here because the container configuration looks a little bit clearer within a docker-compose.yml. The file content looks as follows:
version: '3'
services:
  web:
    build: webapp
    container_name: webapp
    environment:
      JAVA_OPTS: "-XX:+UseContainerSupport -XX:+UseG1GC -XX:+PrintGC -Xms1024m -Xmx1024m"
    ports:
      - "8443:8443"
      - "8080:8080"
    volumes:
      - ./webapp/log:/log
      - ./webapp/keystore:/keystore
- Line 1: The first line just described the docker compose version which is used in the file (check here for more infos about versions https://docs.docker.com/compose/compose-file/compose-versioning/).
- Line 2: services section contains the different container definitions
- Line 3: The name of the container in the docker-compose definition
- Line 4: We want to build the image for this container. There must be a directory on the same level as the yaml file with that name which contains the respective Dockerfile for that image to build. An alternative would be to provide an image name here for a prebuilded image.
- Line 5: The name of the container when it is started.
- Line 6: The tag defines that the environment variables are defined now.
- Line 7: Here is the definition of the JAVA_OPTS which we used in our Dockerfile. I want to use JVM Container Support, G1 Garbage Collection (including some logs) and 1 GB Heap space.
- Line 8: Tag for port definition start.
- Line 9: 8443 on the container should be exposed as 8443 to the outside (here you can for example map the internal 8443 also to default 443 for https).
- Line 10: Same for http with 8080
- Line 11: Tag for volume definition start
- Line 12: The log files the application writes should be visible from the outside, so the directory /webapp/log is mapped to /log within the container. Otherwise we would have to always login to the container to check them. Additionally they would be lost on container restart.
- Line 13: The keystore for the https connection (and token signing) is also mapped from outside. Here the p12 files which is used by the springboot tomcat has to be placed.
New configuration files in Java project
Within the main/resources directory I created a new directory docker which contains a new version of application.properties and config.properties. These configs are used when the new maven profile for docker build is used. The only important change here is that the parameter server.ssl.key-store changes to our defined keystore volume, which should be specified like this (as for the other config you have to change all details for the keystore here):
server.ssl.key-store=file:/keystore/yourkeystore.p12
The maven pom.xml
To not touch the default maven behavior i created another maven profile. For more Info about maven profiles please check here: https://www.baeldung.com/maven-profiles.
The existing build configuration is kept under a new profile named local:
...
</dependencies>
<profiles>
    <profile>
        <id>local</id>
        <activation>
            <activeByDefault>true</activeByDefault>
        </activation>
        <build>
            <finalName>user-webapp</finalName>
...
And a new profile named docker is created.
...
<profile>
    <id>docker</id>
    <build>
        <finalName>user-webapp</finalName>
        <plugins>
            ...
All the plugins and definitions from the other profile are following now, but we need a new plugin for copying our docker definitions and the built jar. For that the maven resource plugin is used as follows.
.....
<plugin>
    <artifactId>maven-resources-plugin</artifactId>
    <version>3.0.2</version>
    <executions>
        <execution>
            <id>copy-docker-compose</id>
            <phase>generate-sources</phase>
            <goals>
                <goal>copy-resources</goal>
            </goals>
            <configuration>
                <outputDirectory>${basedir}/target/docker</outputDirectory>
                <resources>
                    <resource>
                        <directory>src/main/docker</directory>
                        <includes>
                            <include>**/*.*</include>
                        </includes>
                    </resource>
                </resources>
            </configuration>
        </execution>
        <execution>
            <id>copy-docker-webapp</id>
            <phase>generate-sources</phase>
            <goals>
                <goal>copy-resources</goal>
            </goals>
            <configuration>
                <outputDirectory>${basedir}/target/docker/webapp</outputDirectory>
                <resources>
                    <resource>
                        <directory>src/main/docker/webapp</directory>
                        <includes>
                            <include>**/*</include>
                        </includes>
                    </resource>
                </resources>
            </configuration>
        </execution>
        <execution>
            <id>copy-docker-webapp-keystore</id>
            <phase>generate-sources</phase>
            <goals>
                <goal>copy-resources</goal>
            </goals>
            <configuration>
                <outputDirectory>${basedir}/target/docker/webapp/keystore</outputDirectory>
                <resources>
                    <resource>
                        <directory>.keystore</directory>
                        <includes>
                            <include>**/*.*</include>
                        </includes>
                    </resource>
                </resources>
            </configuration>
        </execution>
        <execution>
            <id>copy-webapp-jar</id>
            <phase>package</phase>
            <goals>
                <goal>copy-resources</goal>
            </goals>
            <configuration>
                <outputDirectory>${basedir}/target/docker/webapp/jar</outputDirectory>
                <resources>
                    <resource>
                        <directory>${basedir}/target</directory>
                        <includes>
                            <include>**/*.jar</include>
                        </includes>
                    </resource>
                </resources>
            </configuration>
        </execution>
    </executions>
</plugin>
</plugins>
....
There are totally four executions defined. Three are happening in the generate-sources phase while the last one needs to happen in the package phase.
- copy-docker-compose: copies the docker-compose.yml and the additional scripts (explained below) into a new folder in the target directory ${basedir}/target/docker.
- copy-docker-webapp: copies the subfolder webapp including Dockerfile into the same target folder.
- copy-docker-webapp-keystore: copies the keystore file from a directory .keystore into the keystore directory in ${basedir}/target/docker/webapp/. Please make sure that you never push keystores to any code repository.
- copy-webapp-jar: copies the built jar file from ${basedir}/target into the ${basedir}/target/docker/webapp/jar so that it can be used during image built. The step needs to be executed in the package phase so that always the newest jar is picked up (or that even one is there when you clean before).
Finally the resources section needs a small extension so that the new configurations in the docker resource folder a picked up by this build profile.
...
<resource>
    <directory>src/main/resources/docker</directory>
    <includes>
        <include>**/*.*</include>
    </includes>
</resource>
...
Instead of the src/main/resources/dev now the src/main/resources/docker is used.
Run the java app in a container
After the maven build with the docker profile is completed (e.g. run mvn clean install -Pdocker) the following files should be visible here.
~/projects/user-webapp/target/docker $ ls -R
.:
activate.sh  docker-compose.yml  shellWebApp.sh  webapp
./webapp:
Dockerfile  jar  keystore  log
./webapp/jar:
user-webapp.jar
./webapp/keystore:
yourkeystore.p12
To start the application now inside a container you just have to execute docker-compose build.
~/projects/user-webapp/target/docker$ docker-compose build
Building web
Step 1/4 : FROM openjdk:8
 ---> b273004037cc
Step 2/4 : ADD jar/user-webapp.jar user-webapp.jar
 ---> Using cache
 ---> c189b7304cc0
Step 3/4 : EXPOSE 8080 8443
 ---> Using cache
 ---> b2b233dd6b29
Step 4/4 : ENTRYPOINT exec java $JAVA_OPTS -jar user-webapp.jar
 ---> Using cache
 ---> af3a12edd1cd
Successfully built af3a12edd1cd
Successfully tagged docker_web:latest
And then docker-compose up.
~/projects/user-webapp/target/docker$ docker-compose up
Starting webapp ... done
Attaching to webapp
webapp | [GC pause (G1 Evacuation Pause) (young) 52757K->5312K(1024M), 0.0088325 secs]
webapp |
webapp |   .   ____          _            __ _ _
webapp |  /\\ / ___'_ __ _ _(_)_ __  __ _ \ \ \ \
webapp | ( ( )\___ | '_ | '_| | '_ \/ _` | \ \ \ \
webapp |  \\/  ___)| |_)| | | | | || (_| |  ) ) ) )
webapp |   '  |____| .__|_| |_|_| |_\__, | / / / /
webapp |  =========|_|==============|___/=/_/_/_/
webapp |  :: Spring Boot ::                (v2.5.4)
webapp |
webapp | 2023-02-16 20:12:45.833  INFO 1 --- [           main] c.wwt.webapp.userwebapp.WebApplication   : Starting WebApplication v0.1 using Java 1.8.0_342 on 8961b007deb7 with PID 1 (/user-webapp.jar started by root in /)
webapp | 2023-02-16 20:12:45.836  INFO 1 --- [           main] c.wwt.webapp.userwebapp.WebApplication   : The following profiles are active: default
webapp | [GC pause (G1 Evacuation Pause) (young) 64704K->9500K(1024M), 0.0137983 secs]
You can access the app now under https://localhost:8443/. I added two additional shell scripts to the repository. One is called activate.sh and contains
#!/bin/bash
docker-compose down
docker-compose build
docker-compose up -d
This executes the build and the start in one script (plus take a running container down if exists). Additionally it detaches the running application from the executing shell with the -d option (but you do not see the logs anymore in your shell). Another script is called shellWebapp.sh which contains
#!/bin/bash
sudo docker exec -i -t webapp /bin/bash
This allows to login via shell into the running container, which can be useful sometimes in error situations. It would look like this:
root@8961b007deb7:/# dir
bin   dev  home      lib    log    mnt	proc  run   srv  tmp		  usr
boot  etc  keystore  lib64  media  opt	root  sbin  sys  user-webapp.jar  var
root@8961b007deb7:/#
Here we can operate with a shell inside the container linux.
Leave a Reply